Week 01: Setup Software Used In Course
Activity Instructions
Estimated Time: 15 minutes
One of our goals for this class is to allow you to create a real website accessible with a browser. This, as you will discover in the readings and videos for this week, requires you to have what is known as a host. Most hosts cost money, but not all. For this class, we will be using a free service called Glitch.com . Using this service allows you to create your website with their text editor, save the website, upload the images for the website, and even share the website with an instructor or fellow student for collaboration.
There are a few steps we will need to go through to get everything set up so you are ready to begin..
-
Glitch Login
Visit the Glitch website and click on the Sign in button in the top right corner of the screen. Glitch lets you sign in using either Facebook, Google, email, or GitHub (I like GitHub and use that one)... all are free to use. (If you choose to use GitHub, you would need to have a github account). Click on the Sign in button for the account you would like to use. You may see a screen requesting permission for Glitch to access the account you have chosen to use.
If you choose email signin we recommend NOT using your BYUI.edu email. Glitch will send you a verification email...the BYUI system is currently stopping that email so you can't verify. This will cause you problems later.
-
'Remix' the Starter project
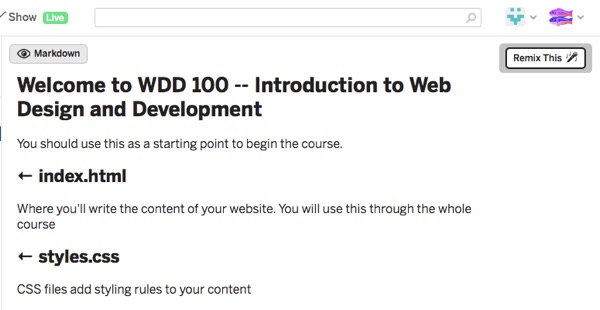
Next we need to create a project for you to use this semester. Glitch makes use of a concept called a 'Remix'. This is essentially taking an existing Glitch project and making a copy of it that you can use and edit. I have prepared a project for this class that you should 'Remix'. Visit this Starter Project AFTER logging into Glitch and then tap the ' Remix This' button in the top right corner of the window. This will create a personal copy of it for you.

Create a New Project -
Become familiar with the interface
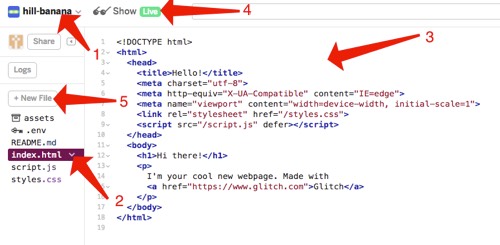
After creating a project you should see something similar to the following:

Create a New Project - This is the random name that Glitch chose for your project. You can change this to something less random if you would like by clicking on the name. You will also find settings that effect the editor (changing theme, wrap text, etc) in here.
-
This is the list of files in the project. Notice in the image
that
index.htmlis selected and open in the editor. Ifindex.htmlis not open in your screen tap on it to open it. - This is the code editor. It is where we will spend most of our time writing HTML and CSS
- This is where you will click to preview your page. It will open a new tab where you can see the results of the code you write.
- This is where you can add a new file to your project.
-
Review the
index.htmlfileBelow is the HTML code that is currently in the
index.htmlfile.<!DOCTYPE html> <html> <head> <title>WDD 100</title> <meta charset="utf-8"> <meta name="viewport" content="width=device-width, initial-scale=1"> <link rel="stylesheet" href="/styles.css"> </head> <body> <header> <div><!-- logo will go here --></div> <nav> <ul> <li><a href="index.html">Home</a></li> <li><a href="aboutme.html">About Me</a></li> </ul> </nav> </header> </body> </html>It's ok if this doesn't make sense yet. We will eventually learn about what each line in this code does. For now let's take a look at the page this code created. Click on the "Show" button. You should see a very basic page with only two links.
-
About me
Lets practice writing a little HTML of our own now. Visit the Getting to know you activity for the rest of the instructions and requirements for this activity.
Other Software
Here is a list of other software we will use this semester. These are all web based and require no installation. Some would require account creation. Your instructor will give you more details when it is time to use them:
- Wireframe.cc Lightweight online tool for creating wireframes, or
- Moqups Another wireframe creation choice. They also have a free educational account available. Obtain by sending an email and requesting with your byui.edu school email account.
- Coolers.co A color theme chooser
