WEB Fundamentals
WDD 130
More CSS: Fonts and Spacing
Activity Directions
Estimated Time: 45 minutes
This activity will use the following new css concepts or properties (review the links if you do not remember these from Khan academy):
Nothing makes a webpage feel like more of a product and less of a project than changing from the default fonts. You should have chosen one or two fonts when you were putting the site plan together for your site. Go review that now.
If you chose fonts from among the web-safe list then you can use them just like Khan academy showed you this week. (Here is another list of the web-safe fonts: http://www.cssfontstack.com/)
If you chose fonts from Google Fonts or elsewhere then we have to make the font available to the web page first before we can use them.
No matter which fonts you are using it is always a good idea to list some fall-back fonts, in case for some reason your first choice doesn't work correctly...you can control how it degrades. Your second choice should be similar to your first (and usually web-safe), the third font in the list should usually be one of the default font families. (serif, san-serif, fantasy, monospace, or script)
So for example if I chose Helvetica as my font for body copy I would add something like font-family: Helvetica, Arial, sans-serif; to a rule modifying the body of my page.
If, however, I wanted to use the font Rock Salt for my headlines, that is not a web safe font and will probably not be on most computers. I have to do an extra step to make it available.
Google Fonts makes it very easy to add your fonts. Find your font in Google Fonts and click it:

Then click on the 'Select this style' to expand it.

Then click on the 'Embed' tab and the '@import' tab.

Copy the line that starts with '@import' and add it to the top of your style.css file. It should look something like this:
@import url(https://fonts.googleapis.com/css?family=Rock+Salt);
...the rest of your css...
Now you can use that font just like normal, ie: font-family: 'Rock Salt', cursive;
-
Change your Body font
Based on your font choices from your site plan, add the appropriate font-family:, and @import lines to your CSS to change the body font and headline font on your webpage.
-
Adjusting font size
Often the default font sizes are fine...but there are times when they need to be changed. For example it's good for the links used for navigation to be nice and easy to click, so lets increase their size. Let's make it 110% of normal. (Remember the 'em' unit of measurement for fonts. 1em = the normal size of your font...so 1.1em = 110%)

Nice to have those fonts in there :) Now notice what is happening anywhere that you have made colored boxes around anything. Here is an example:
The font and image are pressed right up against the edge of the border and it looks...not great. Lets fix it.
The space between the content in a box and the edge of a box is called padding. We can add padding to one or all sides. For example, if I wanted to add some padding to all 4 sides of the box I would do something like this: padding: 1em; (We will learn more about padding next week)
-
Understanding the Box Model
Take a break from your HTML and CSS to read this article Opening the Box Model down to the "In Practice" section. Then come back and continue.
-
Adding Padding
Use padding to space out the content on your page from any edges or borders where it is needed.
-
Paying attention to promixity
Proximity is a design principle that we rely on to help to know which elements on our page are related to each other by their distance from each other. Right now the headlines are the exact same distance from the images as they are from the paragraphs. This can cause confusion in visitor's minds. Do the headlines describe the images or the text? It's hard to know currently.
Let's make sure that visitors to our site know that the headlines and paragraphs are related to each other by bringing them a little closer together. Adjust the line-height and margins of your headlines to bring them closer to the paragraphs they belong to. You could even play with the line-height of your paragraphs to see how it affects readability as well.
When you are done the headlines should be closer to the paragraphs than they are to the images.
-
Why isn't it working?
Using line-height and margin on the headline were you able to get the headline closer to the paragraph than it is to the image? You probably didn't, so what is going on?
The screenshots for this next section are from the Chrome browser. It may help if you switch to that browser for this section if you are not already using it. Make sure that you have also completed the Web development tools section on Khan Academy before proceeding.
-
Browser developer tools
If you are having a hard time getting your headlines to come closer to your paragraphs try this: right click on one of your headlines and select "Inspect". An area on your browser should open at either the side or bottom of the screen that shows both the html and the styles for that element. This is a powerful tool.
When I did this I saw the following:
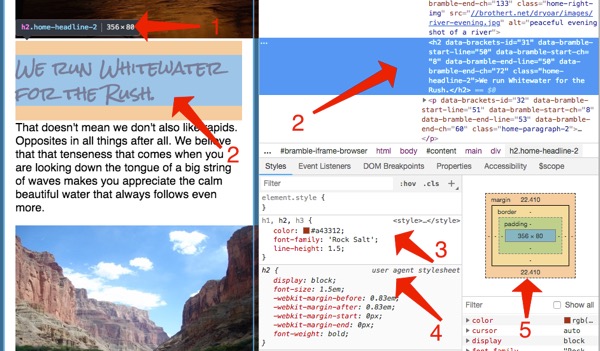
- Notice that browser is showing me the size of the element in pixels.
- It's also showing me where the element I have inspected is both in the code (right) and in the browser window (left). On the left it shows the area it takes up both for size (blue highlight) and margins (brown highlight). If there were any padding it would be green. If you look at the code you will probably see a bunch of stuff in the html that you don't remember adding to your page! Glitch added that to help it do what it needs to do. You can ignore everything prefixed with 'data-'
- All the styles are shown. The third arrow shows styles I defined.
- This arrow shows several styles I did not define. Notice it says "user agent stylesheet" That's just another way of saying "browser default styling".
- Finally we get a graphical representation of the CSS Box Model
The highlighted area, styles, and the box model are all showing in different ways that an <h2> has top and bottom margins defined by default. Those defaults are probably interfering with your desire to move the headline closer to the paragraph.
-
More Inspecting
Now select the paragraph element below the title we are working with. Right-click on the paragraph and select "Inspect" again. This will target that element in the DOM inspector. (Or just click on the paragraph element in the HTML Element pane)
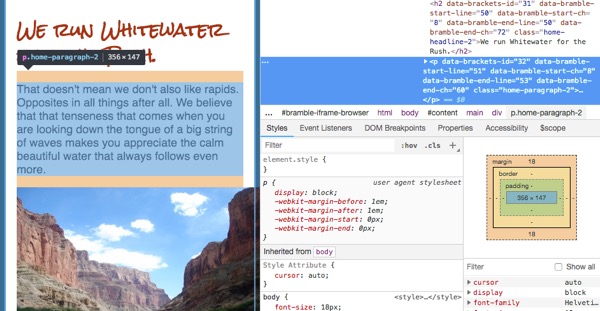
A paragraph element in the developer tools What do you see? If you noticed that this paragraph (in fact ALL paragraphs) also have some default top and bottom margin great job! :)
When two elements by each other both have top and bottom margins, the browser collapses the smaller margin and keeps the larger. So before we changed anything the bottom margin of the
<h2>was about 22px (see first inspect figure above), and the<p>had a top margin of 18px. The space between the elements would be 22px. If we changed the bottom margin of the<h2>to 0 then the space between the two elements would still be 18px...because of the<p>default styles. To get the two elements to move closer together then, we need to address both margins!We have two choices here: we could set a rule for both the headlines AND the paragraphs and adjust margins on both, or we can take advantage of the fact that margins can be NEGATIVE.
A positive margin pushes two elements apart, a negative one pulls them closer together.
In your browser tools try adding a negative margin-bottom to the
<h2>we are trying to style. Once you find a value that looks good, add a rule to yourstyle.css to fix all your headlines that have paragraphs following them. -
Check your site
Preview your site to make sure the web page displays correctly. Pay special attention to whether your images are all displaying. Once verified, submit the URL for your page to iLearn.
Make sure to validate your html and CSS, fix any errors, then submit the URL to your site in ILearn.