WEB Fundamentals
WDD 130
An "About Me" Web Page
Activity Instructions
Estimated Time: 60 minutes
This week we have two important goals. One to introduce you to HTML, and two to introduce you to each other. With this activity we will accomplish both.
-
Setup
If you haven’t already, make sure to complete the instructions in the Software Setup activity.
-
Vocabulary
Let's learn the vocabulary you will need to succeed in this course.
HTML has some very specific vocabulary that comes with it. It is important that we become familiar with it. Spend a few minutes familiarizing yourself with the following list. You will have a hard time making sense of the instruction given in this course if you don't understand these terms.
- Tag
-
HTML tags are key words surrounded by angle brackets: ie
<body> - Element
-
An HTML element usually consists of a start tag and end tag,
with the content inserted in between:
<p>Content</p> - Nesting
-
Elements placed inside of other elements are called nested.
Nested Elements are indented to make it easier to see which
elements are inside of others. Well formatted code (good
nesting) makes it easier for the developer to read their code,
maintain it and troubleshoot it.
<div> <p>Content</p> </div> - Parent
- In nesting the parent is the element that contains other elements.
- Child
-
In nesting a child element is contained
inside of another element
<div> <-- Parent --> <p>Content</p> <-- Child --> </div> - Attribute
-
Attributes provide additional information about HTML elements.
They are placed inside of the opening tag. The value of the
attribute should be wrapped in quotes. ie
<p title="A paragraph about where I am from" >Idaho</p> - Semantics
- Semantics is the study of the meanings of words and phrases in a language. Semantic elements = elements with a meaning. Writing semantic HTML means using the html tag that best describes the content you are adding to your page.
Watch for mention of the terms above as you review the following short tutorials.
Make sure to tap on the "Try It Yourself" buttons in the tutorials to experiment!
Note!
I do not expect you to memorize all of the tags, etc in these links at this point. The goal is to familiarize yourself with the concepts and learn to recognize instances of the terms above. The site that these link to is also a great resource for learning/reviewing HTML and CSS concepts in general.
-
Our first HTML
Let's write some HTML. Open (log into) Glitch, and create a new HTML file. Then rename the file aboutme.html. (It needs to be exactly aboutme.html. No caps, no spaces.) Click on the aboutme.html file to open it in the editor and remove all of the contents. Then type the HTML below.

Creating a file in Glitch This code contains everything you need for a basic web page. It has most of the items listed above. Tags, elements, nesting, parent elements, child elements, and semantics. Can you spot them all?
Note!
I encourage you to not take the shortcut of copy and paste here with the code examples. You will find that your ability to write HTML will improve dramatically if you type them all out.
<!DOCTYPE html> <html> <head> <title>All About Me</title> </head> <body> <header> <nav> <ul> <li><a href="index.html">Home</a></li> <li><a href="aboutme.html">About Me</a></li> </ul> </nav> </header> <main> <!-- Your code goes here --> <p>Hello World!</p> </main> </body> </html> -
Titles and Headlines
A visitor to a website should not have to guess what the page is about. The
<title>says "All About Me". Although you can see "All About Me" looking at the html, it will not show up on the page. This is because<title>is in the<head>section and anything in the<head>is not seen in the browser window. Only items in the<body>section are actually seen on the page. The<title>shows up as the name of the tab or window.We can use a headline element on our page so that when someone visits your page, they will know what your page is about.
There are various sizes of headlines:
<h1>-<h6>These can be used to establish a hierarchy for your page. The smaller the number with the h like<h1>for instance, the larger the text and the more important the headline should be. An<h1>for example should be used for the most important title on the page. You should only use one<h1>on your page.<h2>tags would be the next level and you can use as many as you need. Think about the structure of this course. It is broken up into weeks and activities. An outline using headline elements would look like the following:WDD 100 (<h1>)
Week1 (<h2>)
Software Setup (<h3>)
Getting to Know you (<h3>)
Purpose and Audience (<h3>)
Week2 (<h2>)
Site Plan (<h3>)
Getting Started (<h3>)
Week3 (<h2>)
...To let visitors to your page know what it is about at a glance, let's add a larger headline to advertise. Let's use the
<h1>tag for this. Add a line between the<body>and<p>elements and add an<h1>opening tag, and type "About Me". Then enter</h1>to close the element. Let's add a sub-heading or two as well. Let's use <h2> (smaller text) and put your first name and your nickname if you have one. Do this right after the<h1> About Me</h1>:Now your code should look like this:
<!DOCTYPE html> <html> <head> <title>All About Me</title> </head> <body> <header> <nav> <ul> <li><a href="index.html">Home</a></li> <li><a href="aboutme.html">About Me</a></li> </ul> </nav> </header> <main> <!-- Your code goes here --> <h1>About Me</h1> <h2>Your First Name Here</h2> <h2>Your Nick Name Here (optional)</h2> <p>Hello World!</p> </main> </body> </html> -
Paragraphs
Next, let's write a few paragraphs to tell little bit about yourself. Here is a list of ideas to talk about to get you started. Remember however that this will be a public website...so don't put anything too personal or identifying.
- Your first name and perhaps a nick-name.
- What degree and/or career path are you headed down.
- What are some of the things you love to do, hobbies.
- Are you married, do you have children, grandchildren...
- Do you have a current career/job... are you making a change by pursuing your education.
- The thing you love most about BYU-Idaho. What degree are you pursuing? AA BS, WDD?
- The advantages you see from learning about careers in web design, why you are taking the course, what you hope to get out of it, and how you will use the information in your personal or professional life.
- How long have you been a member of the Church of Jesus Christ of Latter Day Saints? Do you have a favorite quote from one of the leaders of the church? Do you have a favorite scripture?
- Anything else you may want to share.
Start with the <p> (paragraph) that says "Hello World". Replace that with your own information and wording. Each time you want a new paragraph (please break it into more than one paragraph!) Add a new
<p></p>element. -
View your work
When you have finished adding your paragraphs you will want to view your webpage. To do this click on the "Show" button at the top left of the screen. Glitch offers two ways to view your webpage: In a new window and Next to the code. Before you turn in your work you should always check out your page in a new window, but most students prefer working "next to the code" while completing the assignments.
Select the "Next to the code" option under show. You will notice that while we are working on the aboutme.html file, Glitch opened the index.html file. You can use the link in the index.html page to switch pages, but everytime you make a change to the html Glitch will switch back to index! Let's tell it to always show us the aboutme.html instead. Tap on the "Change URL" button in the pane that shows your webpage. In the box type aboutme.html. Now everytime Glitch refreshes the page it will stay on the page we are currently working on!

Change URL Your page and HTML might look something like the images below:

HTML example 
Resulting page -
Add an image
Look's good, but it is a little plain. Let's add an image to dress up your page.
Before you can put an image on your web page, you have to get it onto a web server. Lucky for us Glitch makes this easy. We simply need to upload the image from your computer to your project in Glitch. To do this simply click on the assets link in Glitch. Then drag the image file onto the browser window where you have Glitch open. To use the image on our page we need the path to the image. Often this can be as simple as the name of the image. Because of the way Glitch stores images however we will need a bit of help. After uploading your image you should see it in the browser. Click on it, then click on "Copy Url". We are now ready to use it in an
<img>tag.
Upload an Image 
Image URL Put your image right after the <h1> line. You will start with the
<img>tag. Images require additional information in order to work however. We have to tell the browser where to find the image. We can use an "attribute" for this. (Remember attribute was one of the vocabulary above. If you have forgotten what it is go review). The attribute we need is src="". Add this right after the word img. So it will look like this:<img src="">Paste the name of your image into the "" after the
src. The final tag should look something like this:<img alt="Image of me?" src="https://cdn.glitch.com/e7d21069-86b1-4294-9067-59ab154d710e%2FIMG_5684.jpg?1545880129047" />Notice that I included an extra attribute: alt . The alt attribute should contain a short description of the image. It is shown if the browser can't find the image or it is read for visually impaired visitors to your site. All of your images should have an alt attribute. If a tag has multiple attributes, the order of the attributes does not matter.
There, that looks great.... you coded a web page about yourself that is simple, informative, and has a touch of style.
Your final page should look something like the pages below but with your information and your actual image.

Final Example Preview -
Ilearn Profile
In your I-Learn profile, add a picture that has a close up of your face. This is the image others will see when you make comments on a discussion board.
To add a picture of yourself to your I-Learn profile, do the following:
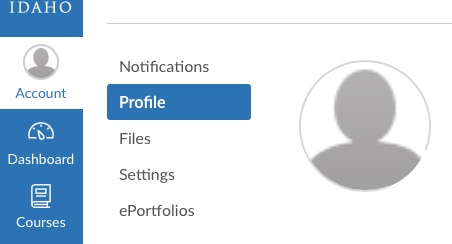
- Click on on the Account button located at the top left corner of the page.
- Select the option titled "Profile" and then the button "Edit Profile"
- Click directly on the placeholder image and either take a picture or upload a picture of yourself from your computer.
- Save your changes and close the window.
-
Post to the discussion board
Lastly, go to the Getting to Know You discussion board, which is at the bottom of this assignment, and do the following things:
- Click the 'Reply' bar
- Make a new post.
-
Paste in the public link to your About Me Web Page. (To find
this with your project open either "Show" your
project in a new window in Glitch then
copy the address, or tap
"Share" then "Live App" and
copy the link there.) Your link should look something like this:
https://my-project.glitch.me/

Finding the right URL - Add contact information to the discussion board post if you would like to make that available to your fellow classmates.
- In the group portion of the assignment, view your fellow student's web pages to get to know those in your class and make comments on at least 5 of your peers web pages. Take some time to get to know your fellow classmates and who knows, you might even make a friend or two!